Browser Extension
The Browser Extension module in CodebaseUp is built on the powerful Plasmo Framework, an open-source software designed to facilitate the creation, testing, and deployment of cutting-edge products on web browsers. This module enables you to seamlessly integrate browser extensions into your web application.
Plasmo Framework 101
It's recommended to read Plasmo Framework Documentation - its quality is top-notch and provides plenty of example code for you to get started.
Find below only the basic concepts to understand what's inside this module.
Extension pages
Extension pages are built-in pages recognized by the browser. They include the extension's popup, options, newtab, and devTools pages.
The popup page is a small dialog window that opens when a user clicks on the extension's icon in the browser toolbar. It is the most common type of extension page.
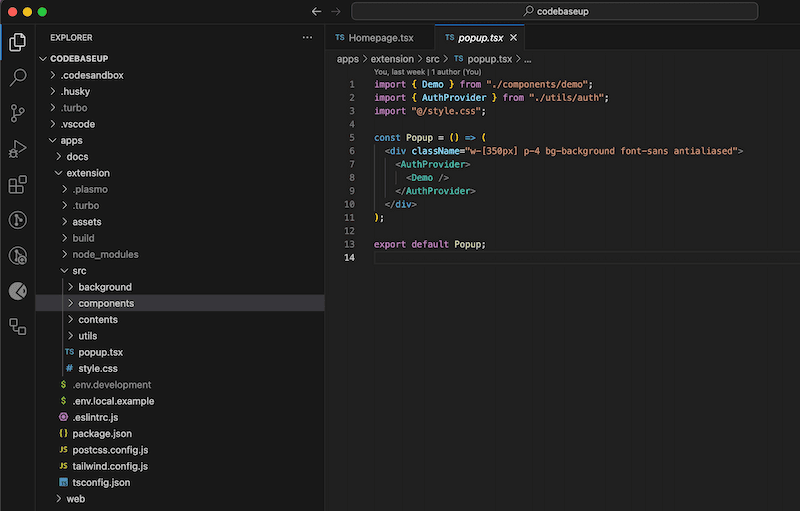
Create a popup.tsx file or a popup/index.tsx file that exports a default
React component. With that, your popup is ready to be used (see
/apps/extension/src/popup.tsx):

For other extension pages, refer to the official Plasmo Framework Documentation.
Content Scripts
Content scripts (files ending with .ts) run in the context of web pages in an
isolated world. This allows multiple content scripts from various extensions to
coexist without conflicting with each other's execution and to stay isolated
from the page's JavaScript.
Use cases:
- Scraping data from the current web page
- Selecting, finding, and styling elements from the current web page
These scripts should be located in the /apps/extension/src/contents/ folder.
Content Scripts UI
Content Scripts UI are a different kind of content scripts. Contrary to the
content scripts above (files ending with .ts), these scripts allows you to
inject UI components into web pages dynamically.
They can be React components, which is why these scripts end with .tsx.
To start injecting UI using React create a .tsx file inside the
/apps/extension/src/contents/ folder and export a default React component.
const CustomButton = () => {
  return <button>Custom button</button>;
};

export default CustomButton;
Background Service Worker
An extension's background service worker is powerful because it runs in the service worker context. For example, when in this context, you no longer need to worry about CORS and can fetch resources from any origin. It is also common to offload heavy computation to the background service worker.
To build your first background service worker, create a background.ts file in
the root directory.
Messaging API
Plasmo's Messaging API simplifies communication between different extension components. It allows you to initiate one-time messages between extension pages, tab pages or content scripts with the background service worker.
This flow is useful to offload heavy computation to the background service worker or to bypass CORS.
Getting Started
To initiate your browser extension project, navigate to the /apps/extension
directory in the CodebaseUp codebase. Here, you'll find the boilerplate codebase
for your extension, ready for customization.
Reusable Packages
The Browser Extension module leverages built-in reusable packages to streamline your development process. These include:
-
ESLint Config: Maintain code quality and consistency with the pre-configured ESLint setup (see
.eslintrc.js). -
Tailwind CSS Config: Easily style your extension using the Tailwind CSS configuration (see
tailwind.config.json). -
Typescript Config: Harness the power of Typescript for enhanced code integrity and development experience (see
tsconfig.json). -
UI: Access a set of UI components designed to expedite your extension's user interface development (see
package.jsonand look up"ui": "workspace:*").
Shared Authentication
The module demonstrate a seamless integration of shared authentication with the
main web app (located at /apps/web). This shared authentication ensures a
consistent and secure user experience across both your web application and the
browser extension.
The Popup Page
The popup.tsx file is a common React component that renders <Demo />
content. The content is wrapped by AuthProvider which is a React Context
provider that sets the authentication status when popup opens:
useEffect(() => {
  const detectLogin = async () => {
    setIsLoading(true);
    const session = await sendToBackground<undefined, Session | undefined>({
      name: "getSession",
    });
    if (session) {
      await setSession(session);
    }
    setIsLoading(false);
  };

  void detectLogin();
}, [setSession]);
When the content is rendered, the AuthProvider sends a getSession message to
a background worker.
The background worker in the ./src/background/messages/getSession.ts (notice
the same file name) captures the message and fetches session from the web app.
import type { PlasmoMessaging } from "@plasmohq/messaging";

const sessionUrl = `${process.env.PLASMO_PUBLIC_APP_URL}/api/auth/session`;

const handler: PlasmoMessaging.MessageHandler = async (_, res) => {
  const response = await fetch(sessionUrl);
  const session = await response.json();
  res.send(session);
};

export default handler;
Note: The web app has to run in order to return the authentication status.
Also, don't forget to set the PLASMO_PUBLIC_APP_URL environment variable in
/apps/extension/.env.development (e.g. http://localhost:3000).
Enable Extension in Development
-
Run
pnpm run dev- this command executes all apps/packages in the repository.To conserve resources, run only the
extensionandwebapps by executingpnpm run dev --filter=webandpnpm run dev --filter=extensionseparately.Ensure that the value of the
PLASMO_PUBLIC_APP_URLenvironment variable matches the port of the web app (depending on the command order, it may run on either port 3000 or 3001). -
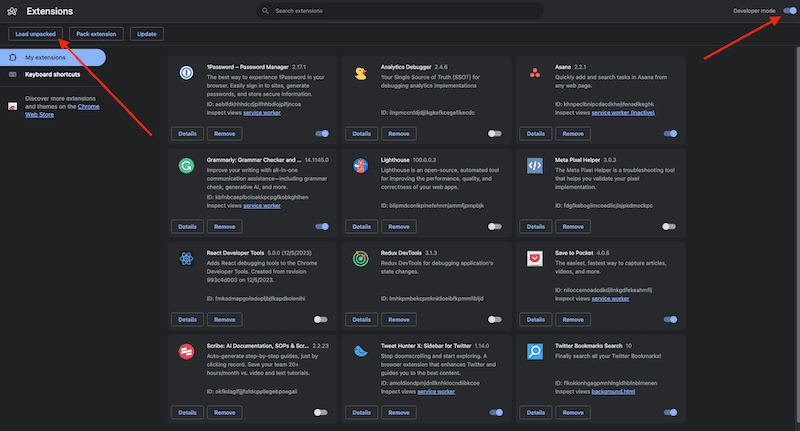
In the browser, navigate to extensions (e.g.
chrome://extensions/in Google Chrome). -
Enable
Developer mode, clickLoad Unpackedand navigate toapps/extension/build/chrome-mv3-dev

- To view your extension popup, click on the puzzle piece icon on the Chrome toolbar and select your extension.
Publish Extension
Refer to the official Plasmo Framework Documentation.